
How can I decrease the bandwidth that my site uses?
ASP.NET abstracts a lot of traditional web development details from
the developer. Just drag and drop a few controls on a form, set some
properties, write a little bit of code, and -- bam! -- you've got a
functioning web site.
However, that doesn't mean the resulting HTML markup will
necessarily be efficient or small. It's not unusual to see ASP.NET
pages that contain more than 100 kilobytes of markup. I recommend that
you keep a close eye on the HTML markup that results from your ASP.NET
web pages -- to keep these file sizes in check can sometimes require
additional effort, which is one reason we covered the topic of web
standards in Chapter 9, ASP.NET and Web Standards.
Solutions
The first rule of ASP.NET bandwidth control is to know how large
your pages are. In Internet Explorer, the File > Properties dialog
will tell you how many kilobytes of HTML markup the current page has
produced, as Figure 15.2 shows. Firefox has a similar dialog, pictured
in Figure 15.3, which can be accessed by selecting Tools > Page Info.
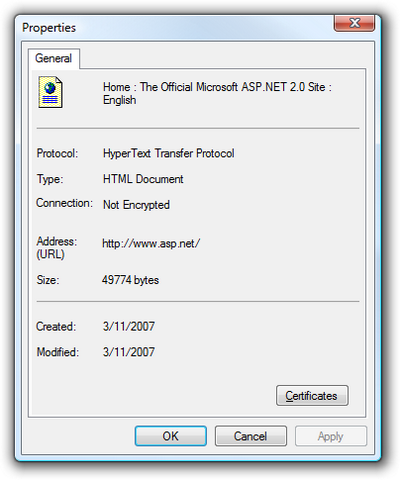
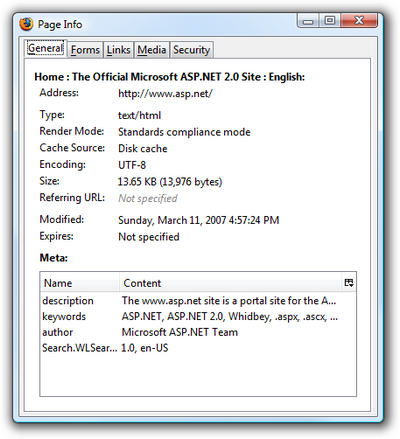
However, note that the Size field in Firefox reports a much smaller
number than does IE 7 -- 13,976 bytes versus 49,774 bytes. That's
because Firefox shows the actual number of bytes that came down over
the wire, whereas IE 7 shows the size of the page after it has been
received by the browser.
How is such a discrepancy possible? Well, the ASP.NET web site uses
HTTP compression to decrease the page size before sending the page.
HTTP compression is a W3C standard that allows the server to provide a
GZIP-compressed version of the HTML content to the client, at the cost
of a very minor increase in CPU time. The client receives the
compressed content, then decompresses it on the fly before rendering
the page. Right off the bat, you can see that this is just one easy way
to reduce the amount of bandwidth you use by an impressive 72% --
simply flip the switch to enable HTTP compression for your web site.
You can enable HTTP compression in two ways. The first takes place
at the web server level; the second is implemented via a custom HTTP
module at the ASP.NET application level.
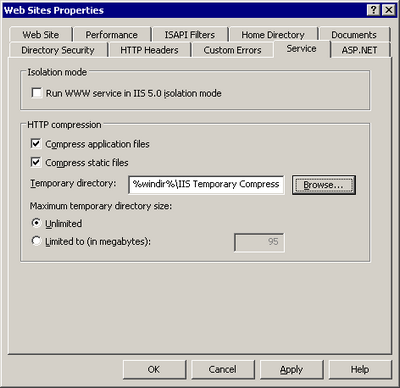
Enabling HTTP Compression Support in IIS 6
Use the IIS Service Manager to enable HTTP Compression in IIS 6.
Right-click the node for your web site and select Properties. The
Service tab contains the settings relevant to compression, as Figure
15.4 shows.
Manual Configuration is Only Necessary in IIS 6
That's right: it's only necessary to configure IIS to enable HTTP compression in IIS 6 and earlier, as IIS 7 enables static compression by default. Windows Server 2008 (which had yet to be released at the time of this writing) may offer a user interface to configure dynamic HTTP compression, but Vista's IIS Manager doesn't.
That's right: it's only necessary to configure IIS to enable HTTP compression in IIS 6 and earlier, as IIS 7 enables static compression by default. Windows Server 2008 (which had yet to be released at the time of this writing) may offer a user interface to configure dynamic HTTP compression, but Vista's IIS Manager doesn't.
The compression setting available in the GUI works; however, it only
affects static content, such as HTML pages and CSS files. This setting
won't do anything to compress dynamic content in ASPX pages. We must
resort to editing the metabase -- the IIS database for configuration
and metadata storage -- to deploy dynamic content compression:
- Open the metabase in Notepad. For IIS 6, this is located at
C:\WINDOWS\system32\inetsrv\MetaBase.xml. For IIS 5, the file is a binary file, so you'll need to download the Meta-data Edit tool instead. - Search for the
- Search for the
HcScriptFileExtensionssection. Add to the list aspx, asmx, php, cgi, and any other file extensions that you want dynamically compressed. Follow the existing format carefully -- it's return-delimited, and any extra spaces will prevent the file extensions from working. Make the same changes in both deflate and GZIP. - Set
HcDynamicCompressionLevelto level 9 (it has a default value of 0, which means "no compression"). I recommend level 9, based on several reports that I've read on the Web suggesting that level 10 requires much more CPU time, while offering only a minimal reduction in file size over level 9. Make this change for both deflate and GZIP.
Note that this is a global compression rule that will affect all web
sites. This setting is usually what you'll want, since HTTP compression
is so effective and the cost is nominal. However, some poorly coded
ASP.NET web sites may be incompatible with compression. In those
circumstances, you may want to enable or disable compression on a
per-site or per-folder basis -- a setting that's also supported by IIS.
The easiest way to configure this setting is to use the command line
adsutil.vbs utility:
C:\Inetpub\AdminScripts\>adsutil.vbs set w3svc/ (site#) /root/DoStat

➥icCompression False

C:\Inetpub\AdminScripts\>adsutil.vbs set w3svc/ (site#) /root/DoDyna

➥micCompression False
The
(site#) number can be obtained from the log properties dialog in the IIS server properties, and usually takes the form W3SVCn, where n is an arbitrary site number.
Enabling HTTP Compression Support in an ASP.NET Application
Perhaps you don't have control over the IIS settings on your server.
Or maybe you'd just like a way to enable compression for your specific
ASP.NET application. That's possible too.
The open source HttpCompress library is very easy to incorporate into an ASP.NET web site. First, download the latest version of HttpCompress from the official web site.
Place the
blowery.Web.HttpCompress.dll binary somewhere logical, and add a reference to it.
Next, add the following compression-specific configuration section to your site's
Web.config:
Example 15.5. Web.config (excerpt)

<configSections>
 <sectionGroup name="blowery.web">
   <section name="httpCompress"
       type="blowery.Web.HttpCompress.SectionHandler,
           blowery.Web.HttpCompress"/>
 </sectionGroup>
</configSections>
<blowery.web>
 <httpCompress preferredAlgorithm="gzip" compressionLevel="high">
   <excludedMimeTypes>
     <add type="image/png" />
     <add type="image/jpeg" />
     <add type="image/gif" />
   </excludedMimeTypes>
 </httpCompress>
</blowery.web>
Finally, bring the actual compression HTTP module into the pipeline:
Example 15.6. Web.config (excerpt)

<system.web>
 <httpModules>
   <add name="CompressionModule"
       type="blowery.Web.HttpCompress.HttpModule,
           blowery.web.HttpCompress"/>
 </httpModules>
</system.web>
Once this is in place, you should see compressed ASPX content being
returned to the browser. To verify that this is the case, use Port80
Software's convenient Real-Time Compression Checker.
One limitation of the HttpCompress module approach is that only ASPX
content that forms part of your application will be compressed; the CSS
and JavaScript aren't served through the ASP.NET ISAPI handler, and
will therefore remain uncompressed. As such, I recommend that you
enable compression at the web server level whenever possible, so that
these files also gain the benefits of compression.


No comments:
Post a Comment